
Guide to Using Your New Wix Studio Website Template
- Emilia Rose

- Sep 19, 2024
- 12 min read
Updated: Sep 2, 2025
Starting a new project is always a mix of excitement and a tiny bit of worry. As a designer, I've seen countless people get a new website template and feel that rush of possibility. You've got this beautiful, pre-made starting point, and you can't wait to make it your own. It's a chance to build something that truly represents your brand and offers value to your audience.
But let me be real with you—the thought of diving into a new website editor for the first time can be a little overwhelming. It's not as simple as clicking a button and suddenly having a finished site. It can take a moment to really understand what all the tools do and how to use them effectively. I remember feeling that way myself. But trust me, with a little attention to detail, you'll be building your dream website in no time.
Quick Finds:
Purchasing the Template
After you purchase your template, you’ll get a transfer email from Wix. You should accept this transfer as soon as you can. Once you do, you’ll find your new template sitting right there in your Wix account. If you don't have a Wix account yet, don't worry! All you need to do is create one using the same email address you used to buy the template, and it will be waiting for you there.
👉 Tip: Before editing, click through every page in your template so you understand what’s included.
Understanding the Editing Modes
Once you open your new template, you'll notice Wix Studio has two different ways to edit: Content Mode and Full Mode. This is super helpful because you can choose how much control you want to have.
Content Mode: This is perfect for simple updates. For example, if you just want to change the text in a paragraph or replace an image on your homepage, Content Mode is the easiest and simplest way to do it. It keeps you from accidentally moving things around and breaking up the layout.
Full Mode: This gives you complete control over your website. This is where you can move elements, change colors, add new sections, or rearrange the entire page. You'll use Full Mode for those bigger changes, like adding a new services page or completely redesigning your homepage.
👉 Tip: Start in Content Mode to get comfortable with the editor and add all your brand colours, copy, and images. Once you feel more confident, you can switch to Full Mode to really make your site unique. Another option is you duplicate your template and keep the original if you ever want to start over.
How to Edit Your Template
One of the first things you’ll want to do after opening your new template is swap out the demo text and images for your own. This is where your site starts to feel like your business. Don’t worry — it’s easier than it looks.

Editing Text
Delete the existing text and type in your own content. Use this area to introduce your brand, describe your services, or add relevant information.
Click to Edit
Click directly on the text box. A cursor will appear, just like in Word or Google Docs.
Delete the placeholder text and type in your own.
Use the Text Settings
Highlight the text → use the toolbar to change the font, size, or colour.
Try not to go wild with too many styles — keep it consistent with your brand.
Make it Clear
Think about what a new visitor wants to know.
Example: Instead of “Welcome to our site”, try “Affordable Graphic Design Services in Manchester”. It’s clearer and helps with SEO.
👉 Pro Tip: Use style guides in the left hand tool bar to change fonts and colour styles quickly across the site.
Editing Images
Your template will be filled with stock images provided by Wix. You can keep these as they are copyright-free, or you can add your own images.
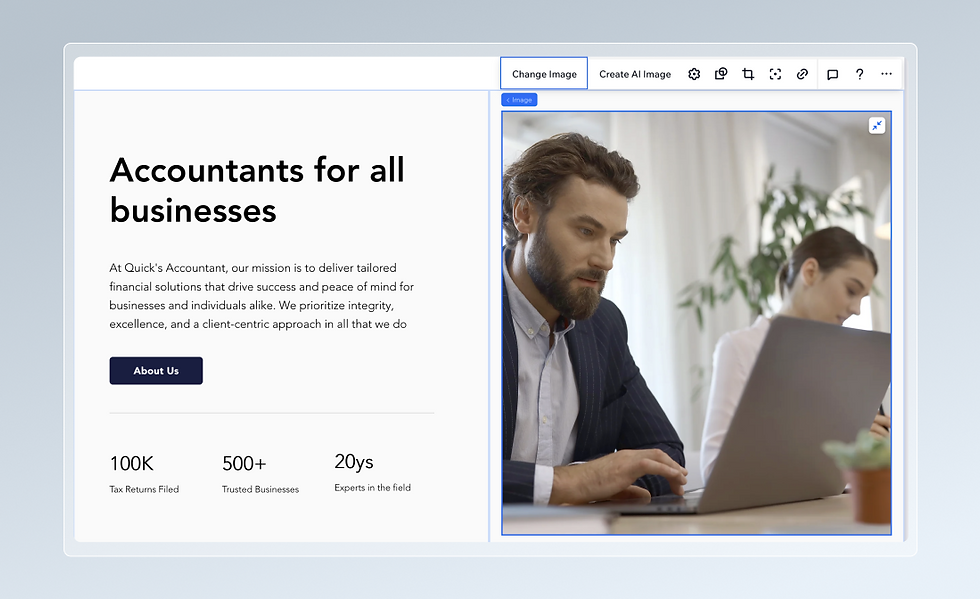
Here’s how to swap them:
Click the Image
Select the picture you want to change. In the right-hand panel, click Replace Image.
Choose Your Image
Upload your own: Perfect for team photos, products, or brand shots.
Use Wix Media: Free stock photos and videos are built in if you don’t have your own yet.
Crop or Adjust
Use the built-in editor to crop, zoom, or adjust the focus point.
Example: If you upload a team photo, make sure everyone’s face is centred and visible.
Keep It On-Brand
Stick to a style. If your brand is modern and clean, don’t mix in cluttered or pixelated stock photos.
👉 Pro Tip: Before uploading, compress your images (use free tools like TinyPNG). Smaller file sizes = faster site loading.
For accessibility, it’s important to add alt text to your images. After selecting an image, click on the small cog (⚙️) icon next to it. In the pop-up, write a short description of the image. This alt text helps visually impaired users who are using screen readers understand what the image represents. It also contributes to your website’s SEO.
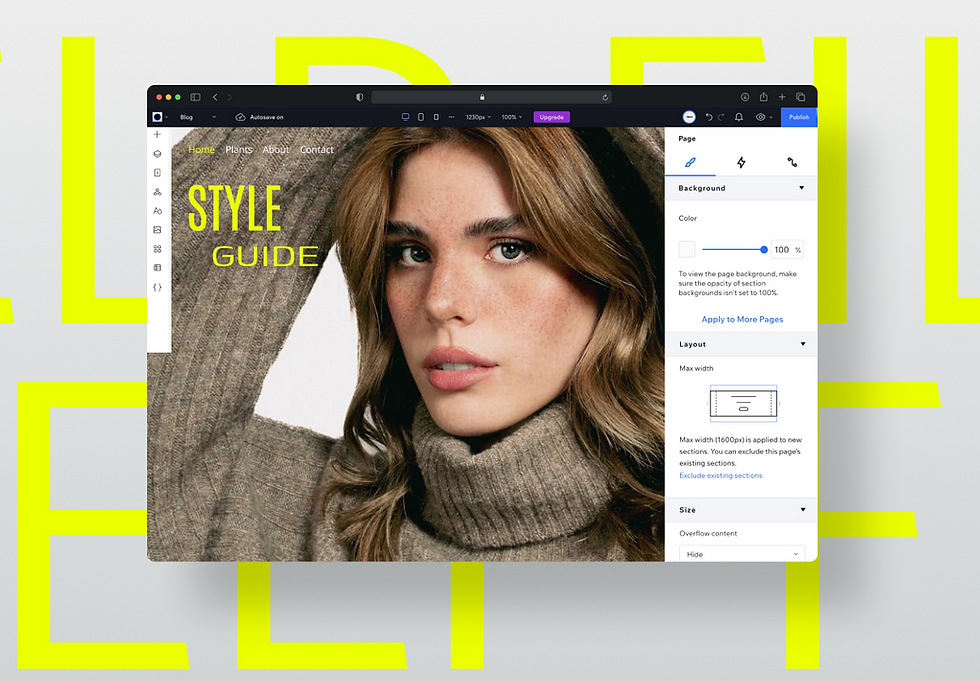
Modify Background

Selecting the Background to Edit
Click anywhere on the background of the section you want to change. This could be a solid colour, an image, or even a video.
Change the Background
After selecting the background, click "Change Background" in the toolbar that appears on the right-hand side.
Select a Colour: You can choose a solid colour or even a gradient that complements your overall design.
Upload an Image: If you want to use an image as the background, upload one from your computer or choose from Wix’s free media library.
Choose a Video Background: For added impact, you can select a video background from Wix’s stock videos. Be mindful of using video backgrounds sparingly, as they can affect page loading speeds.
Customizing Background Layout and Effects
You can also adjust the background’s layout by choosing how it fits across the section (e.g., tiled, stretched, or centered).
Wix also allows you to apply filters and visual effects to your backgrounds, such as blurring or adjusting the transparency, so they blend seamlessly with your text and images.
Adding New Elements and Adjusting Layout
When working with Wix Studio templates, you’ll likely want to add new elements like buttons, images, or text to make the site your own. Understanding how to adjust the layout and use containers, padding, and stacks will help you create a visually appealing and well-structured design. You need to be in Full Mode Editor in order to make layout changes.
Adding New Elements
To add new elements, simply click the “+ Add” button on the left-hand menu in your Wix editor. This will open a list of elements you can choose from, including:
Text: Headings, paragraphs, or custom text blocks.
Images: Single images, galleries, or icons.
Buttons: Call-to-action buttons with customizable text.
Videos: Embedding videos from YouTube, Vimeo, or your own library.
Forms and Widgets: Contact forms, social media buttons, and more.
Once you’ve selected an element, drag and drop it onto the desired section of your template. From here, you can move and resize the element freely to fit your layout.
👉 Pro Tip: you can also add pre-desinged sections that is made by Wix found in the same tool bar on the left hand-side.
Adjusting Layout: Containers, Padding, and Stacks
Understanding how elements are arranged and grouped on your page is essential for ensuring your site looks good and functions well across all screen sizes. Wix Studio uses containers, padding, and stacks to manage the layout of different elements on your page.

Read more on Mastering Dockings, Margins, and Paddings in Wix Studio on our blog.
Containers
A container is essentially a box that holds one or more elements (like text, buttons, or images). Containers help keep your elements organized and allow you to move, resize, or style groups of elements all at once.
Why Containers Are Useful:
Grouping: You can group several elements together in a container so they move and resize as one unit.
Consistency: Containers ensure that your elements are spaced consistently, no matter how much content you add or remove.
Customizing Layouts: You can add backgrounds, borders, or effects to the entire container, instead of adjusting each element separately.
To add a container, simply select “Container” from the “Add” menu. Once placed, you can drag any element into the container.
Padding
Padding refers to the space between the edges of a container, stack, or section. This is important because it ensures that your text or images don’t touch the edges of the container, creating a clean and spacious design.
You can adjust padding to:
Create more breathing room around elements inside containers.
Ensure your content is well-spaced, especially on mobile devices.
Prevent text or images from appearing cramped.
To adjust padding, click on the container or element you want to edit. Then, in the right-hand menu under “Layout”, you’ll find padding controls. You can increase or decrease the padding for all sides (top, bottom, left, and right) or adjust each side individually.
👉 Pro Tip: For the section keep the padding the same through the site for better consistance, for example a good amount of side padding is 35px each side.
Stacks
Stacks are used to group elements so they stay aligned as your page resizes. This is particularly useful for ensuring that your design adapts well on mobile or when users resize their browsers. Stacks help elements stay a certain amount of distance between them. For example, as the screen size gets smaller, you may find certain elements overlapping; stacks prevent this.

Why Use Stacks:
Responsive Design: Stacks automatically adjust the spacing and order of elements to fit different screen sizes. For example, text above an image will remain on top, even when viewed on mobile.
Consistent Spacing: Stacks keep elements evenly spaced, which is key for a clean, organized look.
To create a stack, simply select the elements you want to group and click “Stack” in the toolbar. You can adjust the spacing between items in the stack using the vertical spacing slider in the “Layout” tab.
Final Tips for Layout and Design
Use Consistent Padding: Keep padding consistent across similar sections for a polished look.
Test on Mobile: Always preview your design on mobile devices to ensure containers, padding, and stacks adjust properly.
Experiment with Containers and Stacks: Group elements that need to stay together using containers or stacks. This keeps your layout organized and responsive.
Adding New Pages to Your Wix Site
Expanding your site by adding new pages is a great way to organize content and provide users with a better navigation experience. Whether you're creating an “About Us” page, a blog, or a contact form, Wix makes it simple to manage and structure your website.
Adding a New Page
To add a new page, click on the **“Site Menu”** in the top left corner of the Wix Editor. This will open a list of your current pages. At the bottom of the list, click **“+ Add Page.”** A blank page will be added to your site.
From here, give your new page a name, such as “About Us” or “Blog.” This name will also appear in your site’s menu, so be clear and descriptive.
After the page is added, you can start designing it. Just like with your homepage, you can drag and drop elements onto the page (text, images, buttons, etc.) and adjust the layout to fit your needs. Use the same steps you followed when editing your original template—containers, padding, and stacks can help keep everything organized.
Organizing and Linking Pages
Once your new page is created, you'll want to ensure it's properly linked in your site's navigation menu. Wix automatically adds the page to your main menu, but you can customize the menu structure.
To edit your menu, click on the **“Menus & Pages”** section in the left-hand toolbar. From there, you can drag pages up or down to reorder them, or group pages together under a drop-down menu (for example, grouping all service pages under a “Services” tab).
You can also link to specific sections within your new page by using **anchors**. Anchors help users quickly jump to different parts of your page, making navigation easier.
Finishing Touches
Before your site goes live, it’s time to add those final touches that will take it from good to great! The finishing touches can include small details that improve user experience, enhance accessibility, and polish your site’s design.
Check Your Site’s Responsiveness
Ensure your website looks great on all devices—desktop, tablet, and mobile. You can use Wix AI tool to make sections responsive for mobile, but it’s always a good idea to preview it yourself.
Click on the mobile icon in the top toolbar to switch to mobile view. From here, you can adjust the layout specifically for smaller screens. Check that text is readable, images scale correctly, and buttons are easy to click. Make sure your stacks and padding are working properly to prevent any overcrowded elements.
Set a Custom Domain (Optional)
If you haven’t already, consider upgrading to a Wix Premium plan to connect a custom domain. A custom domain like **www.yourbusiness.com** looks more professional than the default Wix domain. You can purchase a domain directly through Wix or connect a domain you already own.
Publish Your Site
Once you're confident that your site looks good, functions properly, and is ready for visitors, click the **“Publish”** button in the top right corner of the Wix editor. Your site is now live!
Even after publishing, you can continue making updates and changes anytime. Just be sure to hit “Publish” again after any major changes to keep your site up to date.
SEO for Each Page
Optimizing your website for search engines (SEO) ensures that your pages rank higher in search results, making it easier for potential clients to find you. Here’s how to optimize each page on your website.
Here’s how to optimize each page on your website.
This Section Contains
URL Slugs
Meta Descriptions
Page Titles
Alt Text
What is a Slug?
A slug is the part of the URL that identifies a specific page on your website, typically appearing after the domain name.
How to Change the Slug:
Click on the site pages tab on the left-hand toolbar
Hover over the page you want to write the new URL
Click on the 3 dots that appear
Select 'SEO Basics'
Find the URL Slug field
Enter a descriptive, hyphenated phrase about that page
Rules:
Always use lowercase letters.
Use hyphens to separate words (e.g., contact-us).
Keep it short and descriptive.
Avoid using special characters and numbers.

What is a Meta Description?
A meta description is a brief summary of the page content that appears in search engine results.
How to Update:
Click on the site pages tab on the left-hand toolbar
Hover over the page you want to write the meta description
Click on the 3 dots that appear
Select 'SEO Basics'
Enter a concise and compelling meta description in the Description field.
Rules:
Keep it to 155 - 160 characters.
Include primary keywords.
Make it engaging and clear to encourage clicks.
What is a Page Title?
The page title appears in search engine results and browser tabs.
How to Edit:
Click on the site pages tab on the left
Hover over the page you want to write the change the name of
Click on the 3 dots that appear
Select 'SEO Basics'
Enter a unique, descriptive title in the Title field.
Rules:
Include primary keywords.
Keep it under 60 characters.
Make it descriptive and relevant.
“Use Capitals at Beginning of Each Important Word”
What is Alt Text?
Alt text describes images for search engines and visually impaired users.
How to Add Alt Text:
Click on an image in the Wix Studio editor.
Click on the cog icon to add alt text
Enter a descriptive text in the Alt Text field.
Tips:
Describe the image accurately.
Include keywords where appropriate.
Keep it concise.
Don't write "image of," simply say what you see
What are Keywords?
Keywords help search engines understand the content of your pages and improve your ranking for relevant searches. Learn how to use keywords on our blog.
Where to find keywords
Google keyword planner
Semrush Keyword
Backlinko
By optimizing each page with relevant slugs, meta descriptions, page titles, alt text, and keywords, you improve your website's visibility and attractiveness to both search engines and potential clients. Read more on my blog for keywords and backlinks
Closing Thought
Your new Wix Studio template is more than just a design — it’s a head start. With small tweaks, you can make it your own and launch a site that looks professional without the stress of building from zero. Start simple, explore features as you go, and remember: your website will grow with your business.
Frequently Asked Questions
How do I get access to my template after purchase?
After purchasing a template, you’ll receive an email containing a download link for a ZIP file. Once you download and unzip the file, follow the included instructions to upload it to your Wix Studio dashboard. From there, you can begin editing the template.
Can I customize everything in the template?
Yes! Wix templates are fully customizable. You can change text, images, colors, fonts, and even the layout. You can also add new elements like buttons, forms, and videos to fit your needs. The template gives you a strong starting point, but you have full creative control to make it your own.
Do I need to know how to code to edit the template?
No coding is required to edit the template. Wix Studio provides an easy-to-use drag-and-drop editor, so you can make changes by simply clicking on elements and using the available tools. However, if you have coding skills, Wix does allow advanced customization with HTML, CSS, and JavaScript.
How do I add new pages to my site?
To add a new page, click on the "Site Menu" in your Wix Studio dashboard, then click on "+ Add Page." You can name the page and start customizing it like the other pages in your template. New pages will automatically appear in your site’s navigation menu, but you can adjust their position and visibility as needed.


_edited.jpg)