
A Simple Guide to Managing Wix Bookings Feature | Online Appointments
- Emilia Rose

- Oct 23, 2024
- 7 min read
Updated: Dec 6, 2024
This guide will walk you through how to take bookings using Wix’s built-in booking feature, we will be using our beauty website template as an example. Whether you're a hair stylist, nail tech, esthetician, or beauty therapist, this guide will help you understand how to easily add a booking system to your website, set up your calendar, and manage client appointments.
Taking bookings online will make life easier for both you and your clients—no more back-and-forth texts or missed appointments!
Content Quick Finds:
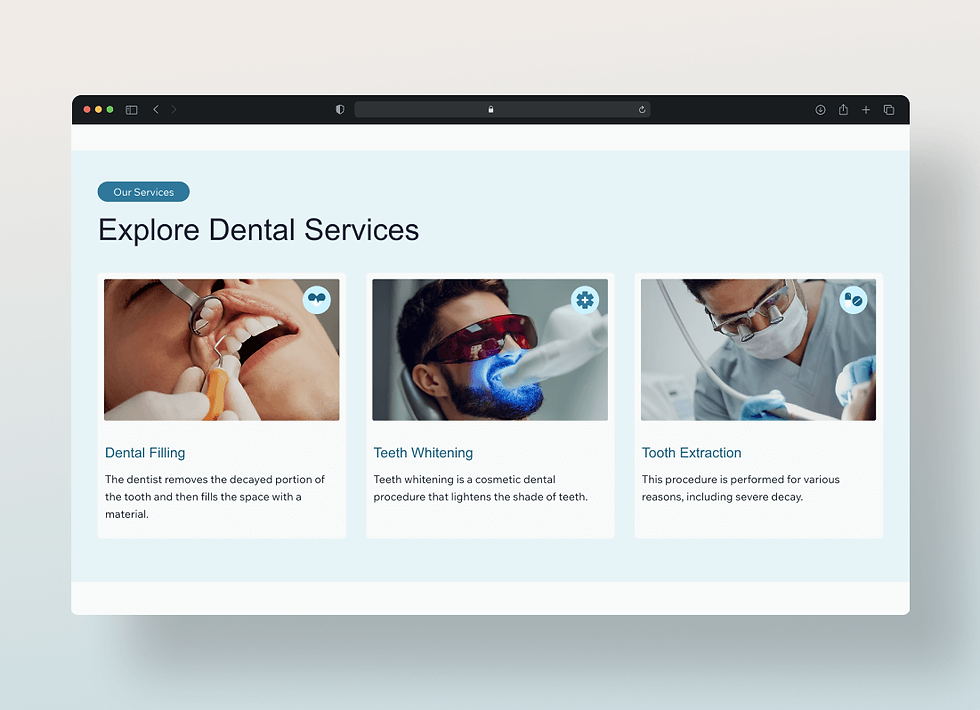
Step 1: Add Your Services
Step 2: Adding Varied Prices for Your Service
Step 3: Offering Service Packages
Step 4: Setting Up Your Calendar
Step 5: Taking Payments
Step 6: Managing Your Clients
Step 7: Tips for a Smooth Booking Experience
Setting and Managing Your Booking Policies
Setting Your Cancellation Policy
Controlling How Early or Late Clients Can Book
Step 3: Editing and Displaying Your Policies
Resources
Step 1: Add Your Services
First, you’ll need to add the services you offer, such as facials, hair treatments, manicures, or lash extensions. This is what clients will see when they book an appointment.
How to Add Services:
In the Wix Editor, go to “Catalog” in the left menu and click “Bookings Services”.
In the “Services” tab, click “+ New Service” to add your treatments or hover over existing service to edit.
Fill in the Details:
Service Name: Name of the treatment (e.g., “Classic Lash Extensions”).
Description: Briefly explain what the treatment involves.
Price: Set your price, or mark it as "varies" if needed.
Duration: Set the length of the treatment (e.g., 60 minutes).
Save your service, and repeat the process for each treatment you offer.
Organize Your Services
You can organize your services into categories such as:
Hair Treatments
Facials
Nail Services
Lash and Brow Services
This makes it easy for clients to find the exact treatment they need.

Step 2: Adding Varied Prices for Your Services
For many beauty services, you might want to offer multiple pricing tiers—for example, charging more for advanced treatments or offering discounts for repeat customers. Here’s how to set those varied prices:
Select a Service:
In the “Bookings” menu, go to Services and click on the service you want to add varied pricing to (e.g., “Facial Treatment” or “Full Set of Lashes”).
Add Pricing Options:
Under the Price section, you’ll see the option to add multiple pricing tiers.
Click “Add Pricing Option” and create different price categories. For example:
Basic Treatment: £50 (standard treatment)
Premium Treatment: £75 (includes extras like a mask or serum)
VIP Treatment: £100 (longer session with additional services like a massage)
Name each pricing option clearly so clients can easily choose the right one when booking.
Customise Service Descriptions:
For each pricing option, add a brief description so clients know exactly what’s included at each price point. This can help clients understand the differences between, say, a standard facial and a premium one.
Save your changes.

Step 3: Offering Service Packages
If you want to offer packages (for example, a package of 5 facials at a discounted price or a combination of treatments), Wix Bookings allows you to easily set this up.
Create a New Package:
In the Bookings section, go to Services and choose “+ New Service”.
Choose “Create a Package” instead of a single service.
Set Your Package Details:
Name your package (e.g., “5-Session Facial Package” or “Lash & Brow Combo”).
Add a description that tells clients what the package includes. For example, “Purchase 5 facial sessions and get 10% off the total price” or “Includes a lash lift and brow tint in one session.”
Set the Price for the Package:
For a package of services, set a combined price. For instance:
1 facial costs £50, but if they buy a package of 5, you can offer it for £225, saving the client £25.
This encourages clients to book multiple sessions, helping to build repeat business.
Package Duration:
You can set the duration of each service included in the package (e.g., 1-hour facials) and how many sessions the client will receive in total (e.g., 5 sessions).
Save the Package.

Step 4: Setting Up Your Calendar
Now it’s time to link your calendar to the booking system. Wix Bookings will sync your availability with your schedule so that clients can only book available slots.
How to Set Up Your Calendar:
Go to the “Bookings Calander” section and click on the “Calendar” tab.
You can sync your Google Calendar with Wix Bookings by clicking “Connect Calendar”. This will help you manage your appointments, so you don't double-book.
Set Your Availability:
You can specify the hours you are available for bookings (e.g., Monday–Friday, 9am–6pm).
Block out time for breaks or days off so clients can’t book during those times.
Staff Members: Add all the staff at your salon or simply just add yourself, make sure to set your workign hours.
Appointment Buffer (Optional): Set up an appointment buffer to give yourself extra time between clients (e.g., a 15-minute break after each treatment).


Step 5: Taking Payments
Wix Bookings allows you to set up payments so clients can pay in advance when they book an appointment. This is great for reducing no-shows and making sure you get paid on time.
How to Set Up Payments:
Go to “Settings” in the Wix Editor and click “Payments”.
Choose how you’d like to take payments:
Stripe or PayPal for online payments.
Cash Payments for clients who prefer to pay in person.
Set your payment preferences:
Full payment upfront.
Partial deposit (this is a good option to reduce cancellations).
Once payments are set up, clients will be prompted to pay when booking an appointment.
Step 6: Managing Your Clients
Wix Bookings doesn’t just manage appointments—it also helps you keep track of your clients.
Client List: Under the “Clients” tab, you can see a list of all clients who have booked with you.
For each client, you can view their appointment history, contact details, and any notes you’ve added.
If you want to remind a client of an upcoming appointment, you can send them a confirmation email or message directly from here.
Customizing Notifications:
You can customize automated confirmation emails or reminders so that clients are reminded of their appointment a day or two in advance.
This helps to reduce no-shows and keeps clients informed.

Step 6: Tips for a Smooth Booking Experience
Here are a few more tips to help you get the most out of Wix Bookings:
Use Buffer Times: If you need time between appointments (to clean up or prepare for the next client), you can add buffer times in your calendar settings.
Test Your Booking System: Before going live, test the booking system to make sure everything works as it should. Go through the process of booking a service to see what your clients will experience.
Keep Your Calendar Updated: Regularly update your availability in the Wix calendar or Google Calendar, especially if your hours change or you need time off.
Promote Your Booking System: Add a clear “Book Now” call-to-action button on your home page and across social media, so clients know they can book easily online.
Setting and Managing Your Booking Policies
When running a beauty business, having clear booking policies is essential. These policies help you avoid last-minute cancellations, no-shows, and late appointments that can disrupt your schedule. With Wix Bookings, you can easily set and customize your booking policies to ensure your time is respected.
In this section, we’ll show you how to:
Set up cancellation and rescheduling policies.
Define late fees and other charges.
Control how early or late clients can book appointments.
Edit these policies within the Wix system.
Step 1: Setting Your Cancellation Policy
A cancellation policy lets clients know how far in advance they need to cancel or reschedule without facing a fee. This protects your business from lost income due to last-minute cancellations.
Go to Cataglog
Select any service and scroll down to the bottom till you see Booking preferences
Select + New Policy from the drop down
Create Your Cancellation Policy:
Fill in the form details and label the policy “Cancellation and Rescheduling”.
Here, you can set the time frame for cancellations:
For example: You can allow clients to cancel or reschedule up to 24 hours before their appointment without any fees.
If they cancel within this window (e.g., less than 24 hours before the appointment), you can choose to charge a fee or keep the deposit.
Add Policy Details:
You can write a clear description of your cancellation policy that will be shown to clients when they book.
For instance: “Clients must cancel or reschedule at least 24 hours in advance. Cancellations within this time frame will result in a fee of £20 or loss of deposit.”
Save Your Changes.


Step 2: Controlling How Early or Late Clients Can Book
To avoid last-minute bookings or too-far-in-advance appointments, you can control when clients are allowed to book. This ensures that your calendar stays manageable.
Go to Booking Settings:
Naviagte to setting and find Booking settings, then select Booking Policy, click to edit.
Set the Earliest Booking Time:
Choose how far in advance clients can book a service. For example:
You can set it so that clients can only book appointments at least 2 hours before the appointment time.
This gives you enough time to prepare for their arrival.
Set the Latest Booking Time:
If you want to control how far in advance clients can book, set a maximum booking window:
For example, you can allow clients to book up to 3 months in advance, but no further.
Add a Description:
In the description section, you can clarify your booking window to clients. For instance:
“Appointments must be booked at least 2 hours in advance. Bookings can be made up to 3 months ahead.”
Save Your Changes.


Step 3: Editing and Displaying Your Policies
Once you've set your policies, it’s important to make sure clients can see them clearly before they book. Wix allows you to display your booking policies on key pages like your Booking Page, Service Pages, and even in confirmation emails.
Add Policies to Your Booking Page:
In the Wix Editor, go to your Booking Page.
And scroll down to booking preferences, select all the policies you wish to display.
For example, you might write: “Please note: All bookings require a 24-hour notice for cancellations or rescheduling. Late arrivals may result in a shortened treatment time or a late fee.”
Update Confirmation Emails:
Go to the Automations section of Wix Bookings (where you control notifications).
In the Booking Confirmation Email, add a reminder of your key policies. This ensures that clients get a clear message when their booking is confirmed.

Conclusion: Start Taking Bookings Effortlessly
With the Wix Bookings feature, managing appointments is simple and stress-free. Whether you're a beauty technician offering haircuts, facials, or nail services, this system allows you to organize your schedule, take payments, and keep track of clients—all in one place. Once everything is set up, your clients can easily book appointments online, and you can focus on providing amazing treatments.


_edited.jpg)